Showing posts with label Polymer Clay. Show all posts

Tuesday, August 2, 2011

Practice & Play with Polymer, Paper, Pop, Peyote, Pink & Peachy


        Let me start by letting you know I'm not talking about smoke but the Peyote stitch in bead work. As I looked back on the work of the past few weeks since I last wrote, I noticed a trend. I chose to work on several pieces that had polymer clay beads that Brad and I had made some time ago. This one is a bit "shabby chic".
      The first necklace came about because of the scrap of thread I showed how to weave into the cord in my last post. I have a hard time throwing things away that are still useful.  I finished the weaving until I got to the end of the string and then wondered how I could use it. I made another tube with beads added and joined them together with a polymer clay piece I had on hand, and also I used blue and white tube shaped beads Brad had made. I did macrame and bead work to attach them together.
            Next I beaded around another polymer clay pendant. It was an odd shape so I backed it with black leather and sewed a foundation of beads for the first row and then added more from there until I had it secure,using a peyote stitch. Then I went about making a necklace to attach it too,but as it progressed I didn't think it would look right together. I made that necklace into a separate project. Here are the two finished projects.

The project I worked on next was using a polymer piece that I thought looked like it needed to be a turtle. I beaded around that also with some seed beads, adding more beads for legs and a head. After I did that, I had a problem I couldn't see how I could keep the beads on the legs and so I added some metal rings. One thing led to another, and I was reminded that I had some feather-like polymer clay beads I had made at the same time. I only had two of them, but for this project it was just what was needed. I also used two large turquoise nugget beads along with some tube beads I had bought some time ago. I like the result.  
As I was working with this project, looking for things to add I found two pieces of heavy chain and formulated a plan for a bracelet using jasper and a large glass focal bead. 
     The next project to take shape was a tree of life necklace made with rose quartz and pink wire tree with a rose quartz tire swing and some tiny crystal butterflies. On the necklace part I added large rose quartz beads and some vintage glass pearls that I removed the flaking paint from, leaving  nice soft white beads. I used enameled flower beads as an accent. This is the result of that effort. 

 Then I found a piece I didn't feel was finished and spruced it up a bit.

 
 Brad and I had a bit of a milestone this last two weeks. I sold two items on my Etsy site.
http://www.etsy.com/shop/RenaissanceHeart Brad's milestone is he got his first check from selling his book on amazon as an ebook.  Fun! Fun! Fun!


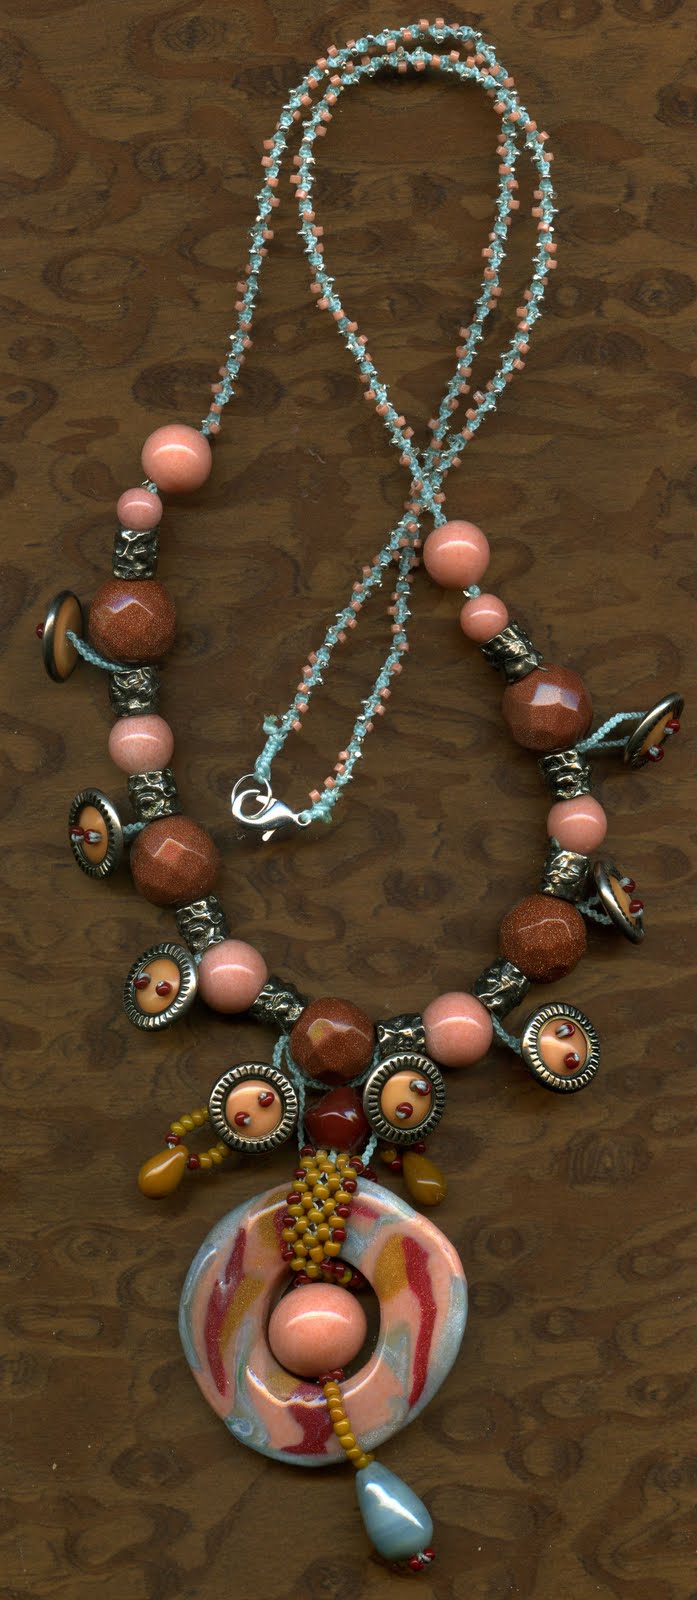
     I finished two more projects. The one I will tell you about next is another polymer clay piece. I used more beadwork in this one too. It was a fun project. I also incorporated some vintage buttons into this project. 


 Last one for this adventure is one made with a vintage poker chip that I had attached an old picture of my dad to. I put black leather on the back of the poker chip and did more  beadwork around the poker chip to attach it. Then I made a bail sort to thing with some beads and then did a beaded necklace to attach it to.
 

So that is it for this time. Hope you enjoyed your visit. Thank you for looking.


Tuesday, February 15, 2011

A Journey of Re-creation2


"If you don’t have time to do it right,
when will you have time to do it over?"
- John Wooden
This is my dilemma. I want to start from the top or have things right the first time. That is sort of a silly expectation, don't you think? I find myself focusing on what I can't do and not on what I can. It gives me a lot of grief. So I, like everyone else, have to start where I am right now. Such as it is, here I go.

This is made with paper beads,a bone cross piece, glass beads, black cord with Chinese knots, and an old poker chip with a woven paper heart attached.


This is a reversible necklace made on an old poker chip base. It has a dragon fly on one side, and a vintage brass button on the other, with a needle tatted frame; some glass beads around, with stone and acrylic long beads between.


  These two necklaces are made with polymer clay and Chinese knots.


Of these two bracelets, the one on the left is needlepoint with seed bead edging and two vintage green buttons. The bracelet on the right is knotted macrame with a center motif on an old poker chip.


These three bracelets are made with needlepoint. The red and white bracelet has some new and vintage beads, and an old button. The middle blue and white one is made with a Japanese border design. On the far right is a black and white one, also Japanese inspired design, with a large vintage mother of pearl button and a small iridescent button on top of that.


The butterfly necklace is made with an old poker chip and beaded around with iridescent glass beads and some purple acrylic accent beads.


This night owl is made with an old poker chip with a felt backing and seed bead enclosure . Large blue glass beads and metal star beads are scattered around. It is hard to see, but I put some purple glitter in the acrylic covered owl and a small rhinestone.


This necklace is made with a poker chip pendant and a Chinese knotted neck piece with cream colored Indian glass beads.


These two also have something that reminds me of my childhood. The picture attached to the good old chip changes as you move it. These came from a puzzle. I think they are bright, lite, cheerful, and fun.


Tree of Life
This is wire work with a piece of an old CD for a backdrop. The beads are vintage , old and pearl-like. The base is a poker chip with a brass wire outside ring.
So what have I learned thus far.


  • I learned working with epoxy is tricky. It's hard to judge how much you will need for a particular project, and you have limited time to work with it. So be prepared to use the extra epoxy if there is any. 

  • I learned Chinese knotting takes time and practice. The end result is quite beautiful, and so worth the effort.
  • If you put yourself “out there” someone might want more of you. I took some of my things to a craft fair and now someone asked me to be a guest artist at the Arts Council. I didn't even know we had one around here.
There are almost endless avenues to explore, so I hope you will enjoy some of them as I go on.
I learned a new technique to transfer images to the poker chips or other objects you might be interested in, if you want to try it yourself sometime.
Let me explain. You take an image you want to transfer and copy it, and print it out with a copy machine that uses toner. I use my laser printer. You can use color or black and white. Make it the size you want to fit the object you want to apply it to. Print it out on regular paper. Then take some clear packing tape and put it over the image and smooth it out so there are no bubbles or air pockets. Then comes the fun part. Get a bowl of lukewarm water and put it in and gently rub the paper part until no more paper is left on the tape. You will have a image of what you printed transferred to the tape. This is what you apply to your project. The great thing about it is, that it still has some sticky to help hold it in place and you don't have to reverse the print on words because they show up right, not reversed as in some other processes.
Here are some examples of things I have transferred.
Notice the words on the right side have blotchy white spots and a little yellow dot. The blotchy things are where I did not get all the paper off, so be sure to check that. Sometimes it is hard to tell there is still paper on the tape when it is still wet. On the left is the example of the words before I took the paper off the back and on the right is after. (The yellow dot was paper on the scanner bed, oops.) Pretty fun thing don't you think? Happy transferring.
Well, that is about it for this time. Take care and enjoy the journey.